For non-Chinese readers:
I'm a software engineer in Shanghai, China, and since I bought a Raspberry Pi, I spent some spare time on it and I'm glad to share something with Pi users all over the world, so this article has two languages: Chinese & English, and I try to translate the Chinese to English as accurately as possible, but, there might be some translation mistakes, so if you don't know what I mean in the article, just leave a comment, and I'll reply when I get an answer. Also welcome to contact me via Email.
Raspberry Pi是什么?
引用维基百科的一句话:
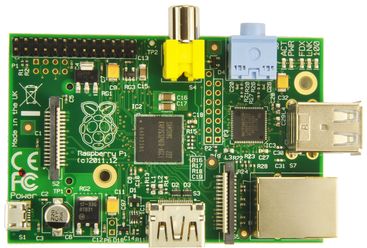
The Raspberry Pi is a credit card sized single-board computer developed in the UK by the Raspberry Pi Foundation with the intention of stimulating the teaching of basic computer science in schools.
简单地说,它就是一个基于ARM CPU的、信用卡那么大的迷你计算机。
In short, Pi is an ARM-based mini computer which has a credit card size.
这货能拿来干嘛?由于它是一台计算机,并且它有着很迷你的体积,最关键的,它还很便宜,因此,用处实在太多了。有人拿它来控制玩具,有人拿它来酿酒,甚至还有人拿它来做超级计算机!
是的,这帮人确实太能玩了...
What can you use it for? Because it's a computer which has a very mini size, and most importantly, it's cheap enough, so it's really useful. Someone use it to control a toy(people outside China mainland may not able to visit this video link due to copyright reason), someone use it to brew beer, and someone even used Pis to build a supercomputer!
文章来源:http://www.codelast.com/
我在Raspberry Pi上安装的系统是官方推荐的几个系统之一:Arch Linux ARM(这不是第一推荐的那个Raspbian)。
What I installed on Pi is one of the official recommended Operation Systems: Arch Linux ARM(but this is not the most recommended Raspbian).
一开始我也是先尝试使用官方推荐的Raspbian,但是由于在刷好系统之后,进入系统之前进行配置的时候,对键盘布局的配置无论如何都无法保存,一直有一个error,导致无法正常使用键盘,所以我最终只能放弃了它,转而使用Arch Linux ARM,这就意味着自己需要做很多的配置工作了。
下面各项,就是我在折腾的过程中遇到的各种问题以及解决办法。
At first I was trying to use the most official recommended OS - Raspbian, but after writing the OS image to my SD card, and before logging into the system, I met an keyboard layout configuration error in the configuration step, no matter how many times I tried, it's always the same, so I had to turn to Arch Linux ARM, which means that I need to do lots of configuration work myself.
Below notes, are the problems I met in the process of configuring Pi and the solutions.
【1】关于分区 / About the partitions
如果你是在Windows下刷的Arch Linux ARM系统,那么,你可能是用官方推荐的Win32DiskImager软件来刷的。Arch Linux ARM的镜像文件(一个.img文件)有约1.8G大,用Win32DiskImager将其刷到SD卡上之后,会发现根目录“/”所在的分区只有1点几G大,并且没有交换空间(swap),这很麻烦,因为我们随便装几个软件就会占满根目录所在分区,例如一个emacs就有几百M大。
If you wrote the OS image to SD card on Windows, you might use the official recommended Win32DiskImager to do the work. The Arch Linux ARM OS image file(an .img file) has a size about 1.8GB, after you use Win32DiskImager to write it to a SD card, you'll find that the partition which contains the root directory "/" has a space of 1.X GB, and there is no swap partition - this is a trouble because the partition space will be used up soon, e.g. installing emacs related packages will use more than 200 MB space.
所以,我们要让根目录几乎使用全部的SD卡空间。例如,我的SD卡是16G的,我想把1G空间拿来做swap,其余的就给根目录了。
So, I need to let the root directory partition use almost the whole SD card space. For example, I have a 16GB SD card, then I want 1GB to be the swap, and the left space to be the root directory partition.
Youtube上有教程说明如何用GParted(一款开源软件)来操作SD卡,从而将更改系统分区的大小,我也曾尝试,不幸的是我在调整好空间大小之后,一点击“Apply”应用我的修改就出错,无法继续下去。所以我最后是采取了一个最简单,也成功了的办法,那就是:使用Ubuntu系统自带的磁盘管理工具来重新分区,听我慢慢道来:
There is a video tutorial on Youtube teaching you how to resize the partition to full SD card capacity by using GParted(an open-source software). I tried that, but failed all the times, whenever I clicked the "Apply" button I got an error and couldn't continue, so at last I used a very simple way to do the same work, and it worked, that is, I used the disk management tool in Ubuntu to "resize" the SD card partition, as following:
(1)进入Ubuntu系统,将SD卡上1点几G的那个分区(也就是根目录所在的分区)里的文件备份成tar包:
Logging into Ubuntu and backup the files in the SD card root partition with a size of 1.X GB to a tar package:
tar cf os.tar XXX/*
其中,XXX是指你的SD卡目录。
这个备份出来的tar包在后面我们修改完分区大小之后,恢复系统的时候要用。
The XXX refers to you SD card directory and the tar package will be used to restore your OS after resizing the partition.
文章来源:http://www.codelast.com/
(2)用Ubuntu系统自带的图形化磁盘管理工具(具体名字记不得了),删除掉1点几G的那个SD卡分区,同时你会发现,有一个十几G的未分配的空间,这就是我们要利用的宝贵空间。然后划分出一个13G的ext4分区(Pi官方推荐的那个Arch Linux ARM镜像刷出来的系统用的就是ext4文件系统),这将作为新的系统所在分区。
Use the graphical disk management tool(I forget the software name, sorry) to delete the SD card partition with the size of 1.X GB, and you'll find that there is an "unallocated" partition which has a size of > 10GB(NOTE: my SD card is a 16GB card) - it's just the free space we want to use. Then create a 13GB partition with ext4 format, which will be used as the new OS partition.
(3)将剩下的空间划分为一个交换空间(swap),如果你觉得此空间太大有点浪费,那么你可以在上一步里把空间设大一点,那么这里剩下的swap空间就会小一点,总之,自己衡量。
Use the left space to create a swap partition. If you think that it's a waste to allocate so much space to swap, you can allocate more space to OS partition in the previous step. Anyway, judge it by yourself.
(4)待Ubuntu操作完成,把SD卡挂载上去,现在,你就有了一个十几G的系统分区和一个1G的swap分区。但是,由于重新分区,系统已经没了,我们怎么恢复?用刚才备份的tar文件就可以恢复。将其中的文件解压到十几G的系统分区里,你原来的设置、安装的软件都不会丢。但是要注意,可能你解压文件的时候,用的不是root用户,而是其他用户,那么你要保证解压出来之后,要修改所有文件的权限为root:
After the partition operation finished, just mount the SD card, then you'll find that you have a > 10GB OS partition and a swap partition, but you lost the OS on the partition, so, how to restore the OS? Remember the tar file we backup before? Yes, unpack the files in the tar package to the OS partition, you'll get your previous OS back! But note that, when unpacking the tar file, you may use a non-root Ubuntu account, so after the unpacking done, we should change the ownership of all files/directories:
chown -R root:root XXX/
其中,XXX为你的SD卡的挂载目录。这是因为刚刷到Pi上的Arch Linux ARM只有一个root用户,我没有添加其他用户,所有文件owner均为root。
The XXX refers to your SD card mounted directory. I do this because I didn't add any other user for my Arch Linux ARM, except the root user.
(5)把SD卡umount下来,插入Pi的卡槽中,启动系统,发现一切正常,成功了!
Then umount the SD card from Ubuntu, plug it into Pi, and boot Pi, everything is OK, it works with no problem.
文章来源:http://www.codelast.com/
【2】添加开机启动的程序 / Run your program on OS startup
要让Pi开机启动一个脚本/执行一个命令怎么办?
我们知道,RedHat有 /etc/rc.local 文件,在里面写上要执行的命令就可以开机执行了,这是最简单的办法,而Arch Linux ARM没有这个东西,它是按下面的方法设置的:
假设我要开机执行一句shell命令,把它写在文件 /etc/rc.local 中(在Arch Linux中,此文件一开始是不存在的):
How to execute a shell script/a command on Pi startup?
For RedHat it's very easy, it has a /etc/rc.local file, we just add the commands to the file, while Arch Linux ARM doesn't have such thing, and I'm a beginner of Arch, so after asking Google for many times, I find a way to do that - suppose I need to execute a shell command, so I create the /etc/rc.local file & write the shell command to it:
#!/bin/bash
# this file defines the commands that will be executed at system startup

echo "abc" > /root/test.txt
为此文件赋予可执行权限:
Give the file the executable permission:
chmod +x /etc/rc.local
然后创建一个文件 /usr/lib/systemd/system/rc-local.service ,内容为:
Then create a file /usr/lib/systemd/system/rc-local.service , with the content of:
[Unit]Description=/etc/rc.local CompatibilityConditionPathExists=/etc/rc.local[Service]Type=forkingExecStart=/etc/rc.local startTimeoutSec=0StandardOutput=ttyRemainAfterExit=yesSysVStartPriority=99[Install]WantedBy=multi-user.target
文章来源:http://www.codelast.com/
创建一个软链接:
Create a symbol link:
cd /etc/systemd/system/multi-user.target.wants
ln -s /usr/lib/systemd/system/rc-local.service rc-local.service
启用服务:
Enable the service:
systemctl enable rc-local.service
重启系统,然后就可以开机执行你的shell命令了。如果要立即启用,则执行以下命令:
Restart Pi, then you'll be able to execute the shell command on OS startup. If you want to execute it without restarting Pi, just execute the following command:
systemctl start rc-local.service
这是使用systemd的启动方式,非常麻烦。
如果你只是简单地要设置一个命令的别名,可以把命令写在 /etc/profile 中,ssh登录Pi的时候就自动会执行。
This seems to be the so-called "systemd" way to start something, and I think the setup process is very tedious.
You can also add the shell command to /etc/profile, and it will be executed when you logging into Pi using ssh.
【3】安装软件 / Install packages
在Arch Linux上安装软件使用pacman很方便,它相当于Ubuntu中的apt-get。例如,要安装gcc,可以这样:
It's very convenient to use pacman to install something on Arch Linux, and it's the equivalent of apt-get on Ubuntu. For example, you can install gcc by typing:
pacman -S gcc
然后Arch Linux ARM会提示你要下载的软件包的情况,以及向你确认是否要进行安装。
在下载软件包的过程中,我的Pi一直提示下载不到某一个软件包的错误,重试无数遍都一样,于是我就只能尝试升级pacman以及系统了,执行:
Then Arch Linux will prompt you the info of the packages which will be downloaded/installed, and ask you to confirm the installation.
In the process of downloading a gcc related package, I met an URL not found error and I tried many times but solved nothing, so at last I tried to update pacman and the OS:
pacman -Syu
升级时间较长(大约小于10分钟),之后再安装gcc,就成功了。
This consumes a bit long time(but < 10 min, depends on your Internet connection speed), and after this I tried to install gcc again, it succeeded.
文章来源:http://www.codelast.com/
【4】配置静态IP地址 / Set up a static IP address
相比设置一个静态的IP地址,我更愿意采取另一种简单的办法来让Pi每次都得到一个固定的IP地址,即:在路由器里为Pi所对应的Mac地址保留一个固定的IP地址。
由于我对Pi所接入的网络的路由器有完全的控制权,所以我可以这样做。由于每种路由器的管理界面是不相同的,所以在此我就不把路由器管理界面的图贴上来了,大家自己看看你路由器的说明书就会弄了。
Comparing to setting up a static IP for Pi, I would like more to take another simple way to let Pi get a fixed IP everytime it accesses to the same network, that is, let the router to allocate(reserve) a fixed IP for Pi's Mac address.
This can be done only because I have full control over the router which Pi accesses. Because different routers have different admin interfaces, so I post no sample images here and you can check the instruction book of your router to figure out how to set it.
【5】设置系统时区 & 时间 / System timezone & time setup
以上海为例,先编辑文件 /etc/rc.conf,添加上如下内容:
Use Shanghai as an example, first we should edit file /etc/rc.conf and add the following content:
LOCALE="en_US.UTF-8"DAEMON_LOCALE="no"HARDWARECLOCK="localtime"TIMEZONE="Asia/Shanghai"
然后做软链接:
Then make a symbolic link:
ln -sf /usr/share/zoneinfo/Asia/Shanghai /etc/localtime
/etc/localtime 原来是指向 /usr/share/zoneinfo/Europe/London,在做这外软链接之后,就指向了 /usr/share/zoneinfo/Asia/Shanghai。
The /etc/localtime was initially pointed to /usr/share/zoneinfo/Europe/London and after we made a new link, it will points to /usr/share/zoneinfo/Asia/Shanghai.
文章来源:http://www.codelast.com/
这样就算设置好了时区了。下面该设置系统时间了。由于树莓派没有实时时钟,因此,最好利用网络来对时,所以使用OpenNTPD是个非常好的选择。
So the timezone setup is done. Then we should setup the system time. Because Pi doesn't has a real-time clock built in, we better use the network to synchronize the system time, so using the OpenNTPD is a good choice.
我系统中安装的OpenNTPD(我不记得是系统自带的还是我安装的了):
The OpenNTPD in my Arch Linux ARM(I forget whether it's installed by me or not):
[root@alarmpi ~]# pacman -Q | grep ntp
openntpd 3.9p1-19
确保 /etc/rc.conf 中有OpenNTPD的启动项:
Make sure that the OpenNTPD is in the auto startup list in /etc/rc.conf :
DAEMONS=(syslog-ng network netfs crond openntpd sshd)
然后重启系统,会发现时间自动同步正确了。
Then reboot the system and you'll find that the time is correct.
如果你发现时间无法同步,那么请执行一下ntpd命令,该命令会加载ntpd配置文件 /etc/ntpd.conf,如果配置文件内容有错,它会提示出来。就算配置文件是正确的,有其他错误也会打印出来。
例如,我升级了如下版本的系统:
If you find that the time cannot be synchronized, then you should execute the ntpd command to see what the problem is. The ntpd command will load configuration file /etc/ntpd.conf and if there is any problem in it, the command will tell you. Even the content of the conf file is correct, the ntpd command will print other error messages out.
E.g. I upgraded my OS to following version:
[root@alarmpi ~]# cat /proc/version
Linux version 3.2.27-14-ARCH+ (nobody@nitrogen) (gcc version 4.7.2 (GCC) ) #1 PREEMPT Tue Nov 20 23:58:09 UTC 2012
然后就遇到了无法同步时间的问题。执行ntpd命令会提示“ntpd: unknown user ntp”。网上Google了一堆文章,找到最后唯一一个可行的解决办法就是:为系统添加一个“ntp”用户:
Then I couldn't synchronized the time. When executing ntpd command it prompted "ntpd: unknown user ntp". After Googling a lot of solutions I found the only one which can solve the problem, that is, add a "ntp" user for the OS:
useradd ntp
然后查看 /etc/passwd 文件,会看到已经添加了该用户。
Then check /etc/passwd to make sure the user has been added.
为安全,编辑 /etc/passwd 文件,将此用户设置为无法ssh登录系统:
For security reason, edit /etc/passwd to forbid the user to login the OS:
ntp:x:1000:1000::/home/ntp:/sbin/nologin
文章来源:http://www.codelast.com/
另外,你也可以用ntpdate(现在已经被官方弃用了)来对时,但首先你必须安装ntp包:
You can also use ntpdate(which is now deprecated) to sync the time, but you have to install package ntp first:
pacman -S ntp
然后,找一个可用的时间服务器来同步时间:
And then find an available time server to sync the time:
ntpdate time.buptnet.edu.cn
【6】配置Emacs编辑C++代码的自动补全功能 / Configure the auto-complete for editing C++ source in Emacs
如果要在树莓派上用Emacs开发C++程序,那么配置好代码自动补全/自动完成功能大有帮助。
If you want to use Emacs to write C++ code on Pi, then the auto-completion should be a big help to you.
CEDET实现了该功能,用的人也比较多,不过,由于树莓派的性能较低,并且CEDET很慢(很多文章都这么说,我没试),所以就不要考虑在树莓派上用这玩意了。
Many people use CEDET to do the auto-completion job, but because of the low performance of Pi, and the CEDET is very slow(many articles said that, but I didn't try it), so just choose something else but not CEDET on Pi.
文章来源:http://www.codelast.com/
那么应该选择什么Emacs插件来实现呢?auto-complete-clang是一个很好的选择。
So what Emacs plugin we should use? the auto-complete-clang is a good choice.
下面,就介绍一下如何配置该插件,让自动完成功能在Emacs中用起来。
Then I'll tell you how to configure the plugin to get the auto-completion work.
为了安装auto-complete-clang,你需要先安装两个东西:auto-complete 和 clang。
Before installing auto-complete-clang, you must install another two software first:auto-complete and clang.
①安装auto-complete / Install auto-complete
首先你要下载auto-complete的源码包,解压之后编译,安装(安装的过程中会询问你安装到哪个目录):
Download the source package, unpack it, compile it & install it(you'll be asked to type an installation directory in the process):
make
make install
Install to: /root/.emacs.d/auto-complete
注意,我把它安装到了一个自己创建的目录下,后面要用到这个目录里的文件。
Note that I installed it to a directory created by me and we'll use the directory later.
在Emacs配置文件.emacs中添加如下四行:
Add the following 4 lines in the Emacs configuration file .emacs:
(add-to-list 'load-path "/root/.emacs.d/auto-complete")(require 'auto-complete-config)(add-to-list 'ac-dictionary-directories "/root/.emacs.d/auto-complete/ac-dict")(ac-config-default)
上面的路径就是和刚才的安装路径,如果你和我安装的路径不一样,请把它改成你自己的路径。
The paths above are just the installation directory, if yours are different from mine, change them.
文章来源:http://www.codelast.com/
②安装clang / Install clang
用pacman安装clang是最方便的:
Using pacman to install clang is the most convenient way:
pacman -S clang
如果你不幸遇到了下面的错误:
If you get the following errors unfortunately:
error: failed retrieving file 'llvm-3.1-4-armv6h.pkg.tar.xz' from mirror.archlinuxarm.org : The requested URL returned error: 404warning: failed to retrieve some files from extraerror: failed retrieving file 'clang-3.1-4-armv6h.pkg.tar.xz' from mirror.archlinuxarm.org : The requested URL returned error: 404warning: failed to retrieve some files from extraerror: failed to commit transaction (download library error)
Then you can choose to update the system:
pacman -Syu
然后再用pacman安装clang,应该就没有上面的问题了。
Then install clang again, and the errors should not occur.
③安装auto-complete-clang / Install auto-complete-clang
其实这一步所谓的安装,不过是下载+配置,并没有像上面一样的编译过程。
Actually the so-called installation in this step is just a process of downloading & configuration, there is no compilation as previous steps.
下载配置文件auto-complete-clang.el,我把它放到了 .emacs.d/auto-complete-clang 目录下。
Download the configuration file auto-complete-clang.el and I put it to directory .emacs.d/auto-complete-clang .
在.emacs中添加下面一句:
Add the following line in Emacs configuration file .emacs:
(add-to-list 'load-path "~/.emacs.d/auto-complete-clang")
该目录就是你放置 auto-complete-clang.el 文件的目录。
The directory is just where you put file auto-complete-clang.el into.
然后再继续添加如下内容(从网上抄来的):
Then continue to add following content(I got this from the Internet):
(require 'auto-complete-clang)(setq ac-auto-start t)(setq ac-quick-help-delay 0.5);; (ac-set-trigger-key "TAB");; (define-key ac-mode-map [(control tab)] 'auto-complete)(define-key ac-mode-map [(control tab)] 'auto-complete)(defun my-ac-config ()(setq ac-clang-flags(mapcar(lambda (item)(concat "-I" item))(split-string"/usr/lib/gcc/armv6l-unknown-linux-gnueabihf/4.7.2/../../../../include/c++/4.7.2/usr/lib/gcc/armv6l-unknown-linux-gnueabihf/4.7.2/../../../../include/c++/4.7.2/armv6l-unknown-linux-gnueabihf/usr/lib/gcc/armv6l-unknown-linux-gnueabihf/4.7.2/../../../../include/c++/4.7.2/backward/usr/lib/gcc/armv6l-unknown-linux-gnueabihf/4.7.2/include/usr/local/include/usr/lib/gcc/armv6l-unknown-linux-gnueabihf/4.7.2/include-fixed/usr/include")))(setq-default ac-sources '(ac-source-abbrev ac-source-dictionary ac-source-words-in-same-mode-buffers))(add-hook 'emacs-lisp-mode-hook 'ac-emacs-lisp-mode-setup);; (add-hook 'c-mode-common-hook 'ac-cc-mode-setup)(add-hook 'ruby-mode-hook 'ac-ruby-mode-setup)(add-hook 'css-mode-hook 'ac-css-mode-setup)(add-hook 'auto-complete-mode-hook 'ac-common-setup)(global-auto-complete-mode t))(defun my-ac-cc-mode-setup ()(setq ac-sources (append '(ac-source-clang ac-source-yasnippet) ac-sources)))(add-hook 'c-mode-common-hook 'my-ac-cc-mode-setup);; ac-source-gtags(my-ac-config)
The directories like /usr/XXX are vary from environment to environment, they can be obtained via following command:
echo "" | g++ -v -x c++ -E -
You can find the /usr/XXX paths from the messages outputted by the command.
After all these are done, open a C++ source file with Emacs to check whether the auto-completion has been available for you.
文章来源:http://www.codelast.com/
【7】设置终端文字颜色 / Setup the terminal text color
Arch Linux ARM默认情况下终端文字是黑白的,对于文件和目录类型不方便区分,为提高工作效率,需要其显示不同颜色。
By default the Arch Linux ARM terminal text colors are just black and white and it's not convenient to identify directories & files. So in order to improve the work efficiency we should setup the text color.
修改 /etc/profile,在最后添加一行:
Edit /etc/profile and add the following line:
alias ls="ls --color=auto"
这样,ls命令显示出来的文字就有不同颜色了。
Then the "ls" command will display the colorful text.
【8】Arch Linux ARM的rontab文件在哪里 / Where the crontab file is
使用 crontab -e 命令可以编辑当前用户的crontab配置文件,但这个文件是位于何处?我更喜欢直接编辑它,因为我可以用我习惯的Emacs来操作。它是在 /var/spool/cron/ 目录下,用户名即为文件名,例如,root用户的 crontab -e 命令编辑的就是 /var/spool/cron/root 文件。
We can use command crontab -e to edit the crontab configuration file of current user, so where the corresponding file is? I like more to edit the file directly, because I can use my favourite editor Emacs to edit it. The crontab file is under the directory /var/spool/cron/ , and with the same name as the Linux user, for example, the command crontab -e ran by root user will edit the file /var/spool/cron/root .
【9】安装dig,nslookup程序 / Install command dig & nslookup
dig和nslookup程序包含在dnsutils包中,所以这样安装:
dig & nslookup are contained in package dnsutils, so you can install them by:
pacman -S dnsutils
如果你用 pacman -S dig 或 pacman -S nslookup 来找,是找死也找不到的。
If you use pacman -S dig or pacmsn -S nslookup to install them, you'll never get what you want.
文章来源:http://www.codelast.com/
【10】备份SD卡上的系统 / Backup the OS on SD card
万一SD卡损坏,你辛辛苦苦配置了很久的系统就没了,所以必须要备份。直接拷贝SD卡里的数据到另一张SD卡上是行不通的,可以通过Linux的dd命令来复制SD卡,非常方便。
If the SD card broken, you'll lose the OS that you've spent weeks on it, so it's very necessary to backup it. It's impossible to backup the OS by simply copying the SD card files to another card, you can do this by Linux command dd.
(A)查看SD卡的设备名 / Check the device name of the SD card
[codelast@ ~]$ dmesg | tail
[487324.668042] sd 7:0:0:0: [sdb] Mode Sense: 03 00 00 00
[487324.668916] sd 7:0:0:0: [sdb] No Caching mode page present
[487324.668922] sd 7:0:0:0: [sdb] Assuming drive cache: write through
[487324.672481] sd 7:0:0:0: [sdb] No Caching mode page present
[487324.672487] sd 7:0:0:0: [sdb] Assuming drive cache: write through
[487324.674866]  sdb: sdb1 sdb2 sdb3
[487324.679206] sd 7:0:0:0: [sdb] No Caching mode page present
[487324.679213] sd 7:0:0:0: [sdb] Assuming drive cache: write through
[487324.679218] sd 7:0:0:0: [sdb] Attached SCSI removable disk
[487325.617680] pool[9188]: segfault at 0 ip 000000000042e62d sp 00007f88ff2c4520 error 4 in udisksd[400000+45000]
可见我的SD卡设备名是sdb。
You can see that my SD card device name is sdb.
(B)备份SD卡上的OS到一个磁盘文件里 / Backup the OS on SD card to a disk file
[codelast@ ~]$ sudo dd if=/dev/sdb of=~/raspberry_pi_os_backup
31537152+0 records in
31537152+0 records out
16147021824 bytes (16 GB) copied, 942.766 s, 17.1 MB/s
在这里,/dev/sdb是我的SD卡,OS被备份到了~/raspberry_pi_os_backup文件中。整个过程花了约15分钟完成(16G的SD卡)。
So /dev/sdb is my SD card and the OS was backuped to file ~/raspberry_pi_os_backup. The whole process took me about 15 minutes(16GB SD card).
文章来源:http://www.codelast.com/
(C)将格式化新的SD卡为ext4 / Format the new SD card to ext4
由于我原来的SD卡是ext4格式,所以我利用Ubuntu的磁盘管理工具将新的SD卡也格式化成了ext4格式。至于这一步是否有必要,我没有试验,但是可以肯定的是:这样做一定能成功。
Because my old SD card has a format of ext4, so I used the Ubuntu disk management tool to format the new SD card to ext4, too. I'm not sure whether this step is a must, but I'm sure that it's no problem to do this and can lead you to success.
(D)将备份的磁盘文件恢复到新的SD卡上 / Restore the disk file to the new SD card
拔下旧的SD卡,插上新的SD卡,用 dmesg | tail 命令查看一下,新的SD卡的设备名仍然是sdb,因此恢复OS的命令为:
Unplug the old SD card, plug the new SD card into your computer, and use dmesg | tail command to check the device name(it's still sdb), so the command to restore the OS is:
[codelast@ ~]$ sudo dd if=~/raspberry_pi_os_backup of=/dev/sdb
31537152+0 records in
31537152+0 records out
16147021824 bytes (16 GB) copied, 5459.12 s, 3.0 MB/s
这个操作时间更长,耐心等待完成即可。
This process takes even more time, just be patient and wait it to finish.
文章来源:http://www.codelast.com/
【11】用pacman -Syu升级系统时提示“error: failed to commit transaction (conflicting files)”的解决办法 / How to fix the "error: failed to commit transaction (conflicting files)" problem when using [pacman -Syu] to upgrade your OS
我在用pacman -Syu升级系统时,提示如下错误:
When I used "pacman -Syu" to upgrade my OS, I got these error messages:
error: failed to commit transaction (conflicting files)filesystem: /bin exists in filesystemfilesystem: /sbin exists in filesystemfilesystem: /usr/sbin exists in filesystemErrors occurred, no packages were upgraded.
这个问题可以通过依次执行以下几条命令来解决,经测试可用:
To solve the problem, you can execute following commands one by one and they worked for me:
pacman -R localepurge
pacman -Syu --ignore filesystem,bash
pacman -S bash
pacman -Su
文章来源:http://www.codelast.com/
【12】清空pacman安装包缓存
某天我用 pacman -Syu 升级OS的时候,提示空间不足,我当时觉得不可思议,因为我在SD卡上存储的东西并不多,于是我用 du -sh 把系统目录挨个看了一下,发现占用空间最大的是 /var/cache/pacman/pkg 这个目录,足足占了我3.5GB!从名字上看,它应该是用 pacman 安装软件时留下的缓存,应该是可以清掉的,于是Google了一下,找到答案:可以用下面的命令清除掉一些旧的缓存:
pacman -Sc
如果要清除全部缓存,则可以用下面的命令:
pacman -Scc
我使用的是前者,执行完后释放了2.8GB的空间,又可以愉快地玩耍了。
文章来源:http://www.codelast.com/
【13】创建用户 & 免密码切换到root
新装好的系统创建用户:
useradd -m codelast
这就创建了一个codelast用户。-m表示在 /home/ 目录下创建一个 codelast 目录,如果不加此参加则不创建。
之后紧接着就修改codelast用户的密码:
passwd codelast
再之后,为这个用户设置免密码切换到root的权限:
visudo
这会自动用一个编辑器打开 /etc/sudoers 文件(注意不能用其他的编辑器来编辑此文件,但这个默认的编辑器太难用了)。
在文件中加上这一句:
codelast ALL=(ALL) NOPASSWD: ALL
codelast ALL=(ALL) NOPASSWD: ALL
表示允许codelast用户免密码执行任何命令。无需重启,保存文件之后用 codelast 用户试一下:
sudo su -
应该就能免密码切换到root了
文章来源:https://www.codelast.com/
➤➤ 版权声明 ➤➤
转载需注明出处:codelast.com
感谢关注我的微信公众号(微信扫一扫):

Arch 镜像写入SD卡后启动,系统有需要使用键盘和鼠标配置的过程么?
鼠标不知道,一直命令行,从来不用鼠标。
键盘貌似不用,直接插USB接口就可用。
你好
我想請問一下分區調整大小那部份
我在RHEL 6使用tar cf os.tar XXX/*
結果會出現以下三行錯誤
tar: /media/62ba9ec9-47d9-4421-aaee-71dd6c0f3707/lost+found: Cannot stat: Input/output error
tar: /media/62ba9ec9-47d9-4421-aaee-71dd6c0f3707/media: Cannot stat: Input/output error
tar: /media/62ba9ec9-47d9-4421-aaee-71dd6c0f3707/srv: Cannot stat: Input/output error
然後就tar失敗了....
tar: Exiting with failure status due to previous errors
我執行ls -l SD卡
發現有三個很奇怪的地方...
d?????????? ? ? ? ? ? lost+found
d?????????? ? ? ? ? ? media
d?????????? ? ? ? ? ? srv
而非正常的
drwxr-xr-x. 2 root root 4096 Feb 28 11:40 sbin
我問朋友,他是說因為RHEL是x86_64架構
不認識arm架構的archlinux
但我還是覺得很奇怪...因為您是用ubuntu....?
請問這是怎麼回事呢?
首先我认为跟架构无关,因为SD卡是ext4分区,所以只要Linux可以识别,就应该可以备份。
其次,通常遇到这种问题,我都不会费尽心思地找原因,我会尝试先解决它:
(1)先换几台机器试一下
(2)如果上面的方法不行,检查一下你的SD卡中有没有放入特殊文件(我也不知道什么算特殊,就是随便看看吧)
(3)再不行,我会重装Arch Linux,并重复上面的步骤来尝试。由于调整分区之前我不会对Arch做太多配置,所以重装系统也不会有什么损失。
我改用ubuntu可以用tar打包了
但解回去後,archlinux就開機失敗...
我放棄找問題了...
直接用parted magic包的gparted調整分區大小解決...
很详细,不错的^^
hi 您好。拜读了 [原创]华为HG255d家庭网关的破解&使用其他无线路由器桥接HG255d直连光猫 我现在按照您的教程都执行过一遍了 但是利用自己的路由器无法连上网。查了一下原因,可能是PPPoE拨号拨不通,路由器的WAN口状态里面显示没有获得外网的IP和DNS,而且我用电脑试了一下PPPoE拨号,显示651错误。不知道您知道这可能会是什么原因吗?如果您能答复,那就太感激了