Raspberry Pi是什么?
引用维基百科的一句话:
The Raspberry Pi is a credit card sized single-board computer developed in the UK by the Raspberry Pi Foundation with the intention of stimulating the teaching of basic computer science in schools.
简单地说,它就是一个基于ARM CPU的、信用卡那么大的迷你计算机。
In short, Pi is an ARM-based mini computer which has a credit card size.
要阅读更多关于树莓派的文章,请点击这里。
If you want to read more about Raspberry Pi, please click here.
用了树莓派一段时间之后,出于保护原因,我打算为它做一个机箱(盒子),完成之后是这个样子:
After using Raspberry Pi for some time, I decided to make a case for it for protecting reason, and it's finished appearance looks like this:
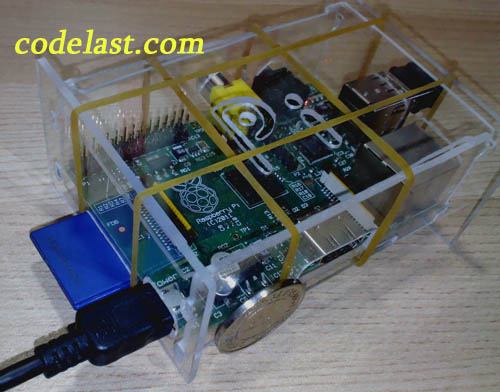
不美观,但是很实用(请忽视图中那个对比高度用的游戏币)。下面就是基本的制作过程。
Of course not beautiful, but very useful(please ignore the coin besides the case). Below is the basic process to build one:
文章来源:http://www.codelast.com/
【1】准备机箱材料 / Preparing case material
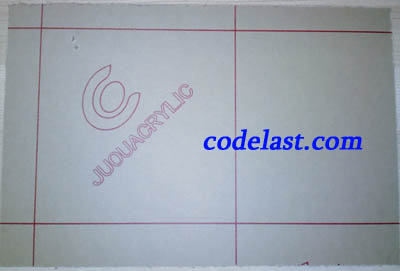
机箱用什么来做最好?金属太硬,不方便加工;厚纸板硬度不够,而且不透明,不好。亚克力板是个绝佳的选择:透明、方便加工、硬度够,而且超级便宜——事实已经证明,价格不到¥2的亚克力板,就可以做出一个树莓派机箱!
What is the best material for the case? Metal is too hard to process and paper board may not has enough hardness & it's not transparent, so the acrylic plate may be an excellent choice: transparent, easy to process, enough hardness, and super cheap - it has been proved that we can make a Pi case with an acrylic plate less than $0.4 !
下面是我买的亚克力板(上面粘了一层纸,撕掉即透明),¥5 一块,尺寸 20cm * 30cm,厚约1.7mm,最后做好一个树莓派机箱用了不到半块。
Below is the acrylic plate I bought(a piece of paper was sticked there so it's not transparent), it's price is less than $1, size is 20cm * 30cm, thickness is about 1.7mm, at last I used less than half of it to make a case.
文章来源:http://www.codelast.com/
【2】准备工具 / Preparing tools
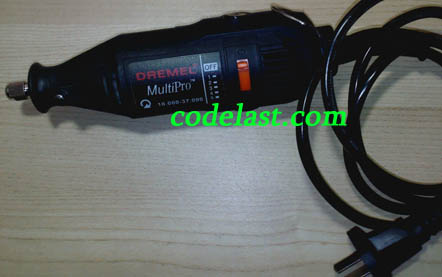
为了能尽快完成这项工作,我先从淘宝上购买了一堆有用的东西,例如电磨(一种打磨用的电动工具),钻头,等等。当然,最好还能准备锉子,小型夹具等,如果条件不具备,那就凑合着开工吧!下面是我的装备——
To improve work efficiency, I bought some useful things from taobao.com(the largest e-commerce website in China), e.g. a electric grinder, some drills, etc. Below are my equipments -
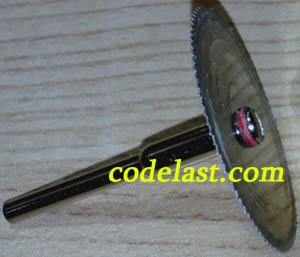
电磨:
The electric grinder:
文章来源:http://www.codelast.com/
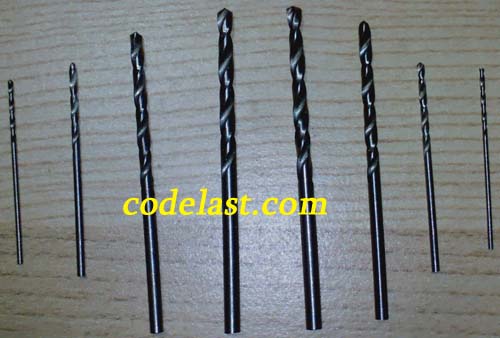
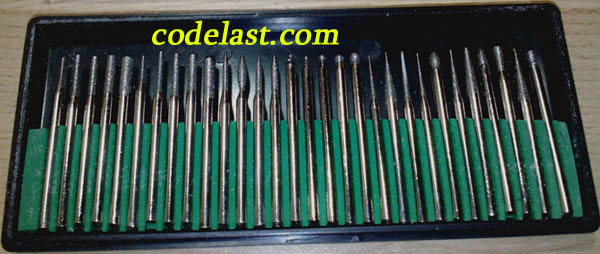
电磨用的钻头:
Drills used by the electric grinder:
文章来源:http://www.codelast.com/
电磨用的切割头:
The cutting head used by the electric grinder:
文章来源:http://www.codelast.com/
电磨用的打磨头:
Grinding heads used by the electric grinder:
文章来源:http://www.codelast.com/
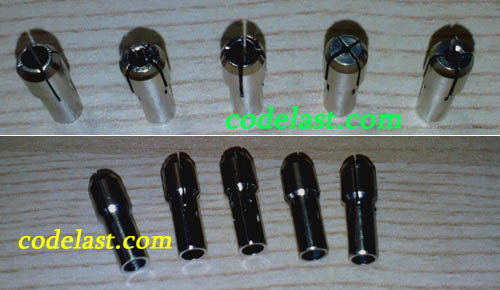
用于固定钻头、切割头、打磨头的夹头:
Chucks used to fix all the drills & heads above:
文章来源:http://www.codelast.com/
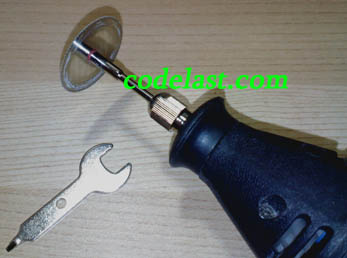
装上了切割头的电磨:
The electric grinder with the cutting head equiped:
文章来源:http://www.codelast.com/
千万不要以为购买这些工具要花很多钱,事实上它们都是山寨货,精度较差,所以都很便宜。所有东西加起来也就大概¥100,非常适合技术宅们买来玩。
Never think that these tools will cost you a lot, actually because of they are all inferior quality products which have low precision, so all of them are cheap to buy. They cost me only about $20 and are very suitable for tech geeks.
【3】量体裁衣 / Cut out acrylic plate to fit Pi
由于我不懂如何对树莓派的三维尺寸进行计算机逆向工程,并且我也没有数控机床等精密加工设备,因此,我只能先把树莓派放在亚克力板上,用铅笔画个大概的尺寸出来——总共要切割6块不同大小的亚克板出来,不能把USB口、网口等尺寸限制得太小,因为纯手工加工的情况下无法做到精确加工,只能多留点余地出来。这里特别要提醒一下,我最后因为两块板的尺寸太小(USB接口和电源接口那两端的板),又重做了那两块,所以,为了防止尺寸不足导致最后重做,板子一定要做大一些,最后再锉掉都没关系。
I don't know how to get the three dimension of Pi by computer reverse engineering, and I don't have any precision processing equipment such as NC machine tools, so I can only use the most primitive method to do the work, that is, put Pi on the acrylic plate, draw some rough lines, and then cut it - totally need to cut 6 pieces of board with different size. You can't limit the USB port & network port to a very small size because you can't process the acrylic plate very precisely, so leaving some some is very important. I'm very regretful that I waste 2 pieces of finished boards because of short size.
在这里给大家一个长宽高的参考值:90mm * 60mm * 35mm,如果没有精密加工设备,建议普遍放大5~10mm。至于其他的每个接口的尺寸和位置,我就给不了你了,因为我也是跟着感觉走的...
Here is a reference value of the three dimension of Pi: 90mm * 60mm * 35mm. Add 5~10mm if you don't have precision processing equipments. And I can't give you any info of all the positions & sizes of the ports on Pi, because I was following my thinking to do that..
文章来源:http://www.codelast.com/
出于散热需要,最后一定要记得在顶盖上方钻一些孔!我是在上面钻了一个“Pi”出来。
具体的加工过程这里就不说了,无非就是噪音+粉尘(记得戴口罩),当然还伴随着快乐。
For cooling reason you should drill some holes on the head cover board, I made a word "Pi" as you seen before.
The detailed process will not be described here because it's just along with noise & dust(remember to wear a mask), and of course, happiness.
【4】组装 / Assembling
我手工做的板子由于精度不够,无法直接嵌合在一起,所以我必须用四根橡皮筋把它们套在一起,也就是前面的图呈现的那个样子。
Because of lacking of enough precision, the self-made boards couldn't be jointed together without any outside help, so I used 4 rubber bands to fix them, as you seen before.
文章来源:https://www.codelast.com/
➤➤ 版权声明 ➤➤
转载需注明出处:codelast.com
感谢关注我的微信公众号(微信扫一扫):