本文软硬件环境:
树莓派:3代 Model B V1.2
OS:Arch Linux ARM,32bit
TensorBoard是Tensorflow的可视化工具。当我们用这篇文章里的方法在树莓派上安装好Tensorflow之后,TensorBoard自然就装好了。于是,下面只剩下怎么启动它的问题。
以下是一个例子。
首先,我们从TensorFlow的官方Github里下载这个文件:
https://github.com/tensorflow/tensorflow/blob/master/tensorflow/examples/tutorials/mnist/mnist_with_summaries.py
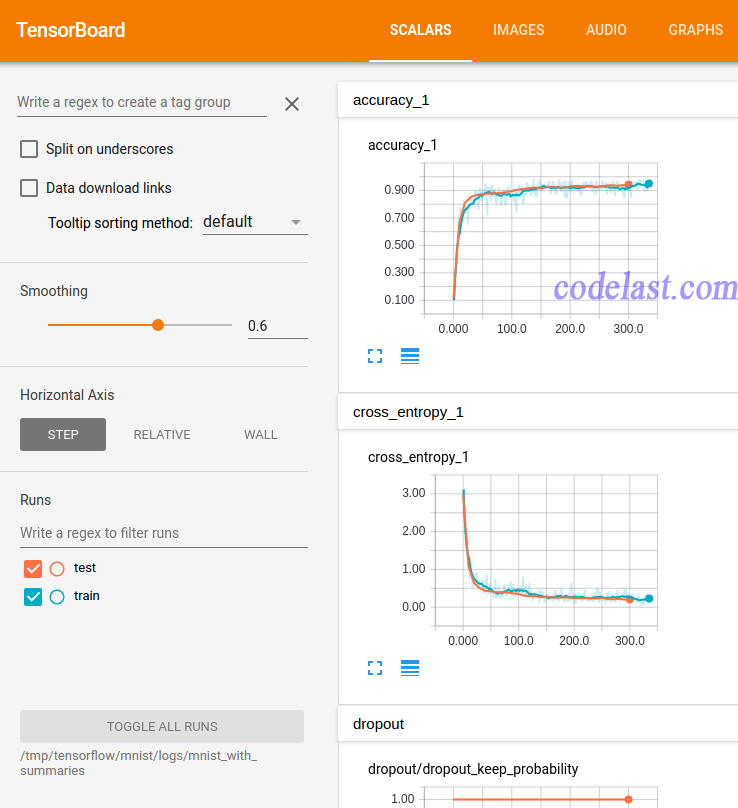
它实现了一个模型训练的过程,并且在模型训练的过程中,将TensorBoard所需的数据文件,输出到了 /tmp/tensorflow/mnist/logs/mnist_with_summaries 这个目录下(写死在 mnist_with_summaries.py 文件中,为了简单无需修改)。
文章来源:http://www.codelast.com/
之后我们把这个模型训练的程序跑起来:
python2 mnist_with_summaries.py
然后程序会自动去下载MNIST数据,并开始训练模型:
Successfully downloaded train-images-idx3-ubyte.gz 9912422 bytes.Extracting /tmp/tensorflow/mnist/input_data/train-images-idx3-ubyte.gzSuccessfully downloaded train-labels-idx1-ubyte.gz 28881 bytes.Extracting /tmp/tensorflow/mnist/input_data/train-labels-idx1-ubyte.gzSuccessfully downloaded t10k-images-idx3-ubyte.gz 1648877 bytes.Extracting /tmp/tensorflow/mnist/input_data/t10k-images-idx3-ubyte.gzSuccessfully downloaded t10k-labels-idx1-ubyte.gz 4542 bytes.Extracting /tmp/tensorflow/mnist/input_data/t10k-labels-idx1-ubyte.gzAccuracy at step 0: 0.1114Accuracy at step 10: 0.6652Accuracy at step 20: 0.8119Accuracy at step 30: 0.8533Accuracy at step 40: 0.868Accuracy at step 50: 0.8723Accuracy at step 60: 0.8779Accuracy at step 70: 0.879Accuracy at step 80: 0.8817Accuracy at step 90: 0.8876Adding run metadata for 99Accuracy at step 100: 0.896Accuracy at step 110: 0.9061Accuracy at step 120: 0.9116Accuracy at step 130: 0.9167Accuracy at step 140: 0.9216Accuracy at step 150: 0.915Accuracy at step 160: 0.9246Accuracy at step 170: 0.9267Accuracy at step 180: 0.9215Accuracy at step 190: 0.9207Adding run metadata for 199Accuracy at step 200: 0.9287Accuracy at step 210: 0.933Accuracy at step 220: 0.9307Accuracy at step 230: 0.9308......
tensorboard --logdir=/tmp/tensorflow/mnist/logs/mnist_with_summaries
其中,--logdir参数指定的目录就是 mnist_with_summaries.py 程序里用 --log_dir 参数指定的那个路径,TensorBoard会从这个路径下读取数据并可视化展示在web页面中。
过一会就会看到命令行提示:
过一会就会看到命令行提示:
Starting TensorBoard 41 on port 6006(You can navigate to http://10.0.0.2:6006)
文章来源:https://www.codelast.com/
➤➤ 版权声明 ➤➤
转载需注明出处:codelast.com
感谢关注我的微信公众号(微信扫一扫):